
Design Phase
In my preview/review of the Dinoot Trailer, I explained the history of the company, along with the impetus for creating a kit trailer that allows for customization while also offering an off-the-shelf selection of parts. In this article Ill share my own process of building up the little Dinoot, and hopefully offer some experiences that will help like-minded off-roaders.
Much of the design process with a Dinoot is choosing what options you prefer. The more you deviate from those options the more you customize it. For my wishes, the key choices were: 1. A home brew frame, and 2. mounting an elevated rooftop tent (RTT). Those two choices, along with opting for the shorter Compact model of Dinoot and the decision to run 35 tires on leaf springs, largely established what Id build.
Although I have access to and can use Sketchup, I didnt choose to do the design in such a CAD-based program. Having trained as a designer, I suppose I opt for Sharpie and sketch pad too easily. As it was, for me, this was fine. Using the latter program, however, may really be a benefit to others in visualizing and designing a trailer. My other caveat is about fabrication experience. If you build a Dinoot and dont create your own frame, Id call it a 2-banana job (on the Shade Tree Howler Monkey Scale of 5 bananas; 5 being pros only). As I built mine, Id call it a 3-banana project.
.")
Although some choose to use a Harbor Freight cargo trailer frame (and even axle), I opted to weld up my own. Ive never taken a welding course, but I have ruined perfectly good steel and slowly learned to lay a decent bead. Ive used/owned stick and wire feed welders, including some pretty nice units that my farmer friend had in his shop. This was the third trailer Ive built. Since then, Dinoot has made the work that much easier, offering a welded frame kit (i.e., with axles, wiring, etc., unattached). The unpainted units are fairly similar to the one I built, and starts around $800, and are custom sized for each specific model Dinoot.
The Tool Bin
Ive been very fortunate to amass a decent collection of tools over my life. Without them, Id be relying upon friends for a project such as this. Still its possible to need a few new items (as any worthy project will). In my case, Id gotten by with borrowing others chop saws. With a Harbor Freight coupon I picked up one for $60. Similarly, I had needed the accuracy of a drill press for some time.

The welder I have now and which I used for all of this trailers fabrication is a Lincoln Weld Pac HD100. Bought used for $150, this little MIG unit will fuse properly cleaned steel up to 1/4-inch thick. It doesnt like welding upside down, and prefers a good gap to fill, but other than that its a terrific tool for the money. Add to it a Harbor Freight self-darkening helmet and welding blanket, and some Hobart gloves, and I was all set.
Other general tools included a pair of angle grinders, drill and impact driver, circular saw, jigsaw, saw horses and miscellaneous clamps, straight edges, and hand tools. Not to be forgotten, I also have a dedicated shop space to work in. Thats not critical, but it allowed for protection from weld-altering wind, as well as the capacity to work later into the night.
Thats really all I needed; however one other nicety I chose (and used) was Harbor Freights electric hoist. Our shop has exposed rafters above, and mounting the hoist on a temporary steel frame that spans multiple joists would mean a newfound ease of lifting heavy objects when working solo (it was also great for weighing objects in conjunction with a Do-All Outdoors Power Hang 550-pound game scale from Amazon).
Materials
My basic frame design began with the Dinoot plan. This is important to consider, as Scott has done the essential layout for how the tub and floor bolt up to the frame. From that layout, I made some subtle variations. First, I used a single spine that formed the tongue and backbone of the frame. Made from 3/16 wall 2x3 square tube, it is a strong, straight axis upon which the remainder was built. To accommodate a rear-mounted 2-inch receiver, this backbone also provided a strong foundation for affixing attachments (e.g., hitch cargo carrier, bike rack, shackle for recovery).

The remainder of the frame was 1/8 wall 2x2 square tube. I cant see any reason to choose a smaller material. The strength gains one needs, however, are critical. To understand the relative strength of various steel stock, as well as to grasp the actual weight savings of lighter/smaller material, I relied upon a number of trailer frame building resources. For instance, using a simple section strength chart I could see that 3/16 wall 2x2 square tubing with a 48 tongue had a capacity of only 870 lbs. The 2x3 rectangular tube I chose, with the same wall thickness, has nearly 50 percent more strength, and yet the weight difference is a mere 1.4lb/lf. Hence choosing the larger material added only 16 lbs. to the frame.
The Dinoot tub consists of sidewalls, and not the trailers floor. There are several options you can choose to create the floor/deck. Scott recommended Baltic birch, which I sourced from a fine woodworking supplier in Salt Lake City. The 3/4-inch material is of a much higher grade (e.g., less twisting), and with more plies, than the plywood from a big box store.

The Build
The Dinoot was primarily built during two phases: trailer + RTT mount; kitchen + storage.The time breakdown for the first phase was tracked, and resulted in the following amounts:
Phase 1
Preparations:
Researching (10hr)
Data collection (2hr)
Overall design (4hr)
Parts sourcing (6.5hr)
Tool acquisition (4hr)
Subtotal: 26.5hr
Construction:
Frame prep, layout and cutting (3hr+)
Frame welding & grinding (4hr)
Frame spring mounts (1.5hr)
Frame deck mounting tabs (2hr)
Frame prep & painting (6hr)
Deck marking (1hr+)
Deck cutting (1hr+)
Cut & glue wood strips for deck (1hr)
Spar urethane finished deck (1hr+)
Mounting deck (1hr)
Mounting tub (2hr)
Mounting fenders (2hr+)
Wiring/mounting lights (1.5hr)
Axle/spring mounting (2hr)
Tire/wheel mounting (.5hr)
Hitch/jack mounting & painting (2hr+)
Jerry can rack construction (3hr)
Jerry can rack prep & painting (2hr)
RTT frame construction (8hr)
RTT frame prep & painting (3hr+)
RTT mounting (1hr)
Subtotal: 50+hr
Phase 1 Total: 78+hr
Phase 2
Preparations:
Researching (5hr)
Data collection (2hr)
Overall design (2hr)
Parts sourcing (2hr)
Tool acquisition (0hr)
Subtotal: 11hr
Construction:
Shock mount prep, layout & cutting (4hr+)
Shock mount prep & painting (1hr+)
Rack upgrades (4hr)
Roadshower mounts & awning mounts (3hr)
Hydraulic lift & mount (3hr+)
Nerf bars & rocket box mounts (5hr)
Kitchen box frame prep, layout & cutting (6hr)
Kitchen box frame prep & painting (2hr)
Kitchen box mounting (1hr)
Propane tank mount (2hr)
Subtotal: 32hr
Phase 2 Total: 43+hr
Taking on a DIY trailer build can, as you see above, consume a lot of hours. Some aspects of the design can greatly expand those hours. For instance, the RTT mount alone adds a good deal to a trailer. When you factor in creating a telescoping design such as ours you add significantly to the total. Bear that in mind each time you think of a cool new idea to make the trailer more awesome. My own approach was to test the base design before deciding what else was needed. I would ultimately find areas to change, but the basic trailer was frankly really good.
The foundation of my design was absolutely the solutions provided on the Dinoot site that anyone can draw from. Scott planned it that way, and he is extraordinarily open about sharing ideas, improving the design, and helping others avoid the School of Hard Knocks.
Where my design deviated was in the frame, which was meant to have a motorcycle hitch carrier added up front, and some fairly hardcore off-road capabilities. The other changes were more add-ons than deviations. For instance, the vertical telescoping RTT mounts simply use four 1.75 square tube uprights welded to frame extensions. Likewise, the nerf and kitchen setups augmented the basic frame, adding versatility and protection.

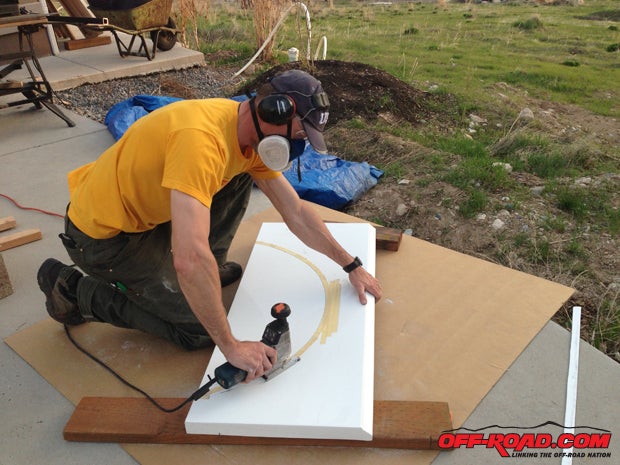
Perhaps the one significant (though subtle) change I made was to effectively add a body lift to the Dinoot deck design. Although the stock trailer is designed to run up to 33 tires, planning to run 35 tires meant a need for more fender clearance. After a good bit of measuring and sketching I found the easiest approach was to insert a 2x4 wood spacer to sections where the frame and the deck meet.
Using a combination of Titebond III wood glue and screws, the 2x4 was affixed to the underside of the deck. The extra 1.5 of lift, much like a body lift on a vehicle, ultimately proved to be crucial for clearance with the big BFG tires when loaded, dropping off ledges, or bombing down dirt roads.

Among the most appreciated Phase II changes were the awning, hydraulic lift, and kitchen. The awning is a simple 6x7 canvas rollout style unit. Two 1/8 thick steel tabs welded to the RTT rack gave it a secure mount. The hydraulic lift is equally simple. The Harbor Freight 3T hydraulic long ram jack is placed in the center of the trailer where it presses against a center rib below the RTT. A section of steel channel fitted to the rams piston prevents slippage. The result is a near effortless lifting of the RTT and its rack. You can comfortably raise the whole affair at the rate of one foot per minute. Elevated the max 20 to add clearance for walking under the open awning and tent, the jack will fully descend in 4 seconds.

The kitchen is a simple swing-out armature that holds an aluminum UWS Footlocker tool chest. Its pivot is a sleeved steel tube, braced to the frame and jerry can rack. A POWERTEC 20306 Latch-Action toggle clamp holds the arm securely to the RTT rack.

A propane tank mount secures the little 10-lb. unit adjacent to the kitchen box. Using the swing arm, the kitchen can instantly be swung under the awning for protection and to create a central cooking area.
Reflections
Would I change anything in hindsight? I realized too late the integral nerf bars are far easier to add when the frame is first being created. The most vulnerable points are the rear corners. Landing the fiberglass tub on a boulder is going to reveal its Achilles heel. A pair of corner sliders will let you drag the rear of the trailer off steep drops. On a similar note, I would have created a unified rear bumper from 3/16 2x2 square tube. This would allow for the accidental backing into a rock/tree/loading dock. In doing so, I would integrate corner sliders into it, and move the 2 receiver further to the rear. The only drawback I saw with this is limiting the tailgate from dropping down and out of the way for loading heavy gear (which is a feature Ive come to appreciate). Though Im not clear on the design Ill use, I am very clear that some such protection will be added.

The other key protection is a pair of RTT sliders. What for? If youve ever feared damaging your expensive tent by rubbing it against a tree or cliff then you get it. Or, if youve seen a trailer dropped on its side, like we did on Moabs Top of the World Trail, you also get it. A pair of sliders could be a huge money saver if you wheel your trailer in narrow, rough conditions.
The other key mistake, but one still readily fixed, is brakes. Despite the trailers light weight, in hard trail conditions (especially very lose rock/mud) the lack of electric brakes is an obvious disadvantage. The minor added cost for them when ordering a custom axle is, in hindsight, a no-brainer. When in doubt, order them. If you never wire them up it will have been a minor loss. In our case, well need to replace the idler hub with drum hubs to retrofit in the brakes.


Whats next? Theres no doubt that an undercarriage water tank would be invaluable. Id like to find one approximately 4x40x36. Ideally it would be a nylon construction, and I would add a skid plate over it (though with the 35 tires my clearance just forward of the axle has never been an issue). The tank would offer 25 gallons of onboard water, and lower the center of gravity by placing 200 pounds of ballast below the deck. At the same time, I expect to add the aforementioned front receiver to allow a motorcycle carrier or second bike rack.
Another useful addition will be LED area/kitchen lights and a dedicated deep cell battery. As the cost of such systems continue to fall itll be easier to justify putting them on our low-budget Dinoot. An addition I was planning on but now have reservations about is a lid/cover. We frequently load the Dinoot from its deck to the bottom of the RTT. Odd-sized objects, frequent need for access, and our regions dry climate make the addition of a lid potentially more hindrance than help. For now, well stick with a cargo net from Northwest River Supply and putting critical items inside the Land Cruiser.

Postscript
Is an affordable, light, trail-ready trailer possible on a budget? Absolutely. Built-from-scratch trailers can certainly be done on the cheap. But the Dinoot breaks new ground by giving you a head start on a DIY solution. At two recent events I was reminded of the beauty of this option. At Cruise Moab 2014 I observed an LED light solution for trailers and tents that sold for more than I spent on the entire suspension on the little Dinoot. At Overland Expo, where I studied nearly a dozen makes of off-road trailers, along with dozens of home-brewed models, one proud owner was selling his gorgeous custom Land Rover trailer. Asking price? Significantly more than a new, top-end Range Rover Evoque.
With time, tools and the Dinoot kit, you can build a very tough and light 4x4 trailer for under $2,000. How much would it cost to replicate our base trailer (i.e., w/o RTT and kitchen)? Heres the tally:
Compact tub w/ tailgate opening--$860
Tailgate--$240 (after discount)
Tailgate hinges & latches--$66
Spring and mounts--$139
Fender flares--$93
2 receiver--$14
Lights--$56
Bulldog Jack--$38
Lock-n-Roll--$308
Safety cables--$26
Shocks (Tenneco gas charged PN 20776) & mounts--$55
Steel (excluding RTT rack)--$150
Plywood & hardware--$50
Paint/Spar urethane--$45
Blades/disks--$35
Silicone/glue--$15
Fiberglas resin/cloth--$25
Axle--$130
Tires & wheels (used)--$165
Total: $2510 (S&H excluded)
This year, the Dinoot line has grown. Theyve added a really neat M416-based model, the M-Series, which is also laid up from beefy fiberglass.
The variety of kit parts has expanded by 20% or so, and theyre offering custom tub creation. So depending upon the look you want, the Dinoot line offers solutions that can be personalized to meet your needs.
For our family, the Dinoot J-Series has been a stellar addition to our on- and off-pavement adventures. Weve loaded it to the brim with 1,000lb+ of rafting supplies, hauled tools and stacks of lumber up locker-required trails, and used it to support extended backcountry trips, including a 4-day mountain bike ride through Utahs canyon country desert.

Its been towed at 80 mph for hours, gone airborne over USFS roads, and survived 6+ rated trails. Our only regret? Not enough time to use it!
Check out the first story on the Dinoot trailer review.
|
Off-Road.com Newsletter Join our Weekly Newsletter to get the latest off-road news, reviews, events, and alerts! |
Follow @Off-Road
 Your Privacy Choices