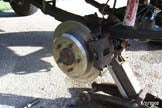
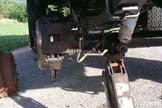
You've scored that find at the local u-pull-it yard, or you just plunked down the cash to someone else who found it. Regardless you've gotten one of the hard to find XJ D44 axles that came under some 87 & 88 XJ's. Now you're rebuilding it. The brakes on the axle are most likely shot, and why spend the money to buy new drum brake parts when for less money you can install disc brakes. Right? Follow along as we show how to take ZJ rear discs and retrofit them to your XJ D44.
You'll need:
-
ZJ rear disc backing plates
-
ZJ rear calipers & pads & e-brake shoes
-
ZJ rear discs
- ZJ rear brake hoses
- New axle shaft bearings
- New axle shaft seals
- Custom machined spacer
- New wheel studs
Here's how you do it:
First you have to disassemble the old brake hardware and remove the axle shafts. There is a 4 bolt retainer that has to be undone and then with the aide of a pry bar or a slide hammer you should be able to yank the axle shafts out. Remove the race from the axle assembly and you'll need to remove the bearing and bearing retainer collar off of the shafts. You can press them off or drill/cut them off if you're careful not to cut the axle shaft.
Now, to the modifications....
|
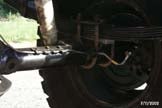
If you hold up the drum brake backing plate up to the ZJ disc backing plate you will notice that the 4 holes that are used to secure the backing plate to the axle don't line up. (If you are attempting this swap on another XJ axle the holes 'may' line up but they won't on an XJ D44). The key is to rotate the ZJ bracket far enough that you can drill new holes. This is a challenge and some of the new holes will be VERY close to the old ones or slightly overlap. To remedy this situation, I used some of that metal epoxy putty that you get at the auto parts store. It has a huge compressive strength that ought to be plenty for this application. The next thing you have to do is bore out the center hole on the backing plate/dust shield so that the axle seal can pass through. This is also where you take measurements for the seal spacer. I had a machine shop make them out of stainless steel. Cost me about $30 total for both. Measure the outer dimension of the seal (approx. 2.90"), and also the inner dimension of the bearing retainer plate. This will be the outer and inner dimension for the spacer. Then measure with calipers the thickness of the drum brake backing plate at the center hole, and subtract that from the thickness of the ZJ disc brake backing plate The spacer is required because the ZJ backing plate is thicker than the drum brake backing plate. In order to keep the proper bearing preload the spacer is required. I don't want to list the exact dimensions here because this is something you need to measure for yourself in case your assembly might be slightly different dimensions than mine. Once you get the center hole bored, and the 4 retaining bolts redrilled test fit the backing plate on the axle. To the left you'll see the assembly of the bearing retainer collar, bearing, seal, spacer, and the retainer flange. This is the order they should be pressed onto the axle shaft. Now you're almost done. You'll want to test fit the axle shafts with the new bearings and spacer etc. before you put the e-brake shoes on. It should all be a snug fit. The spacer will push tightly against the seal giving the bearing the proper preload, when the 4 retaining bolts are tightened. The only things left to do are to tighten the 4 retaining bolts, install the e-brake shoes and address the e-brake cable hook and the rear brake lines. The e-brake shoes have small flexible bent metal retaining springs that hold the shoes on. Other than that it's pretty self explanatory. You'll see in the picture showing the back of the brake bracket how I addressed the e-brake cable connector. I cut the end off of the XJ cable hook and welded it onto the ZJ e-brake tab. There are probably plenty of other ways to do this also. The center hole of the rotor may have to be bored out just slightly to slide easily over the D44 axle shaft. Yours may fit perfectly, I needed a quick pass with a sanding drum to open it up enough to slide all the way on to seat properly. Now mount the rotor and put the brake pads in the caliper and mount the caliper on the bracket. Disc brakes have a short length of flexible hose that attaches to hard brake line because when the caliper actuates it moves horizontally and after repeated use could cause fatigue and ultimately rupture if only a hard brake line was used. I purchased a set of braided stainless steel hoses because I have braided stainless on all my other flexible hoses. I bought 2 weld on brake line tabs (5/8" center hole) from a local speed shop and welded them in place on the axle. Then I custom bent new hard brake lines to mate to the new stainless hoses. Once you've got your caliper all mounted and hoses and e-brake cable all setup, The brakes are pretty much done. Make sure to bleed the brakes REAL well starting with the right rear first, and then the left rear. Many people feel or think that a master cylinder upgrade is needed to run rear disc brakes. This is not the case. I noticed a sizable increase in rear stopping power without any master cylinder modifications or swaps. There are some simple mods you can do to increase the rear brakes if needed that we might feature in the future.
|


 Your Privacy Choices