by Tony Carricaburu
|
August 2001 -- After talking with Mountain Off Road Enterprises (M.O.R.E.), I was convinced that their bolt-in cage was by far the best cage on the market for my YJ. So, I picked up the basic kit with the optional two center spreader bars, and a frame tie-in kit to provide greater stability and strength.
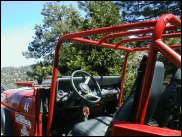
In order to install the cage, I first had to remove the hardtop and slid it back about a foot so that I was able to fold down the windshield frame. I then removed the old factory roll bars that attach to the YJ windshield frame by two Torx-style bolts per-side. These are basically useless additions to the factory roll bar if you ask me. I was happy to see them go, considering the only purpose they ever provided me was a hand grip when wheelin. I then had to remove one bolt from each side of the window securing bracket. This is the three-bolt bracket located just above the factory speaker locations. This allowed me to fold the windshield down for the first time in my Jeep life. I was actually surprised to find some interesting items that fell behind the windshield frame. See pictures below. INSTALL PART 2:
It was now time to install the new side bars, we'll not completely install the bars but put them in place and hand tighten the bolts for now since other roll-cage addition are going to also be installed. See picture below. (Click on image for large view) INSTALL PART 3:
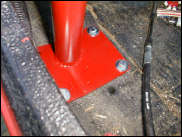
After installing the cross bar and setting the two optional spreader bars into position it was time to start bolting some of these bars down. Since I had already drilled and bolted the cross bar down to the side bars its was time to drill and bolt the side bar floor board mounts and bolt them into position. I went ahead and began drilling and bolting down the floor-board side bar plates. Before drilling these holes I had a friend pull on the side bar bringing the side bar as close as they could away from the dash and towards the inner rock panel. This step isn't required but I wanted the cage to be further away from the dash than the bar was setting at rest. this would avoid rattling or rubbing on the dash, plus this would give me a touch more leg and foot room in the floor-board area. After securing the driver-side floor board mount I followed the same steps on the passenger-side with the exact same results. See pictures below for details. INSTALL PART 5:
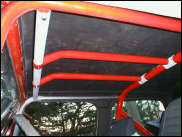
INSTALL PART 6: The M.O.R.E. Cage is almost coming to a conclusion. I went ahead and finished the sport-cage's finish by sanding and priming the rest of the bars for a couple coats of paint. Using the same rattle can matched Krylon red I sprayed a first coat on all the bars including the bolts, nuts and other bars that already had paint (basically everything). I then had to wait a couple hours for that coat to somewhat dry before I sprayed a couple more coats of red on. For some reason this heavy-duty Krylon paint takes forever to dry even at 75 degrees with the sun baking on it. Around the dash and floorboards I had to mask off some cardboard pieces so that I didn't get over spray on everything. Behind the bars on the dash side were a little tough to get, being about 2 inches away from the dash, but with a couple distant sprays I was able to mist a couple good coats on. See pictures below for pictures of the cage un-painted and completely painted red.
Follow @Off-Road
Buyers GuidesVisit Forums JEEP FORUMS
Copyright
VerticalScope Inc.
| ||||||||||||
 Your Privacy Choices